Photographing a Single Flower Without Overcomplicating the Frame
A flower is one of the easiest subjects to find and one of the easiest to photograph badly. The colour is attractive, the shape is already interesting, and the subject does not move very far. That apparent simplicity encourages a quick picture from standing height, with every leaf, fence, pot and patch of soil included around it.
A stronger photograph often comes from doing less. Instead of searching for an exotic bloom or a complicated camera setting, choose one flower and spend a few minutes changing only your position. The exercise works with a phone, a compact camera or a larger camera. What matters most is deciding what should remain inside the frame and what should disappear.
Start with the background
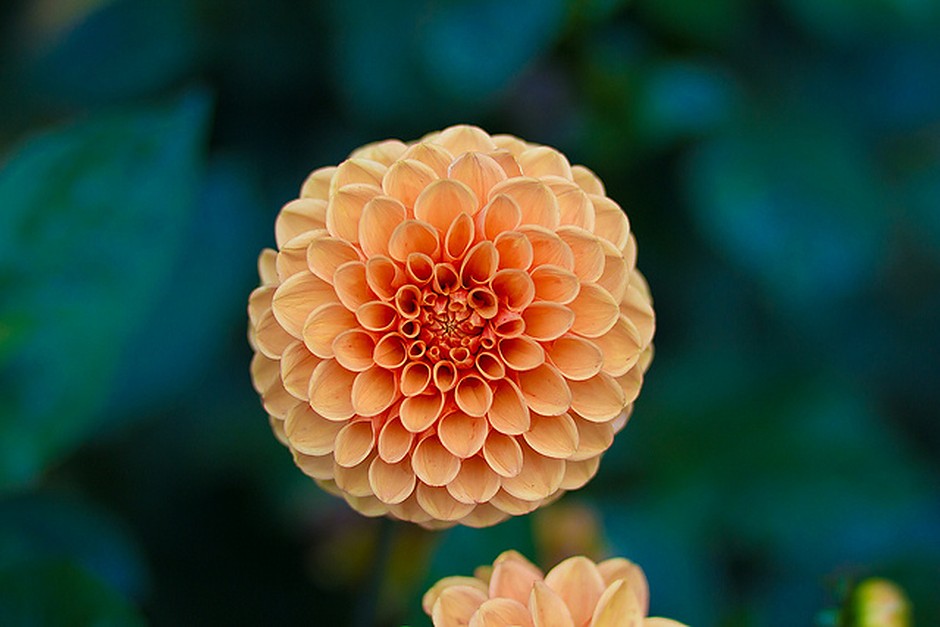
Before focusing on the flower, look past it. A bright wall, a pale paving stone or another saturated bloom can compete with the subject even when it is out of focus. A darker hedge or a shaded patch of leaves may give the flower a cleaner outline.
Moving twenty centimetres to one side can completely change that background. So can lowering the camera until the flower is seen against foliage rather than ground. This is usually more effective than trying to fix a distracting photograph later.
The background does not have to be perfectly smooth. A few soft shapes can give the image depth. The useful question is whether those shapes support the flower or pull the eye away from it.
Choose a distance before choosing settings
It is tempting to move as close as the camera allows. Close-up detail can be beautiful, but a flower also has a relationship with its stem, leaves and surrounding space. Try three distances before settling on one frame.
First, photograph the flower with enough space to understand where it is growing. Second, move closer so the flower becomes the clear subject while a little context remains. Third, make a tight image that studies petals, texture or the centre of the bloom.
Looking at those three versions makes composition decisions easier. Often the middle distance is the most balanced because it keeps the subject dominant without turning it into an isolated specimen.
Soft light is easier to shape
Direct midday sun can make a bright flower look flat in one area and harshly shadowed in another. Softer light—from an overcast sky, open shade, or the edge of morning and evening—usually gives petals more gradual changes in tone.
You do not need to wait for perfect weather. If the flower is in a pot, move it near a window or into open shade. If it is in the ground, photograph from the side that receives softer light. Even your own shadow can briefly change the look of a close subject, though it is worth avoiding a hard camera-shaped shadow across the petals.
Backlight can also be interesting when thin petals become slightly translucent. In that case, expose carefully so the brightest parts keep some texture rather than turning into a blank patch.
Pay attention to the four edges
Many composition problems are not in the centre of a photograph. They happen at the edges: half a leaf enters from one corner, a cut-off stem touches the border, or a bright object appears just inside the frame.
After composing the flower, deliberately inspect the top, bottom, left and right edges. Decide whether each partial object belongs there. A clean edge makes a simple subject feel intentional.
This is also a good moment to reconsider centring. A symmetrical flower can work beautifully in the middle, especially when the petals form a strong circular pattern. An off-centre placement can feel more natural when the stem bends or when the flower faces one direction. There is no rule that must be followed; the frame should respond to the shape of the subject.
Let one imperfection remain
Real flowers have bruised petals, small holes, uneven colour and awkward leaves. It is easy to become so focused on a pristine image that the photograph loses the character of the actual plant.
Choose carefully, but do not remove every sign of weather and age. A folded petal or tiny blemish can keep the image from feeling generic. The goal is not to make a catalogue illustration unless that is specifically what you want.
Likewise, a little movement from wind can produce an interesting frame rather than a failure. If the shutter speed is slow enough, the stem may blur slightly while the centre remains readable. Sometimes that gives a better sense of a garden than a perfectly frozen photograph.
Take fewer final frames
Once the background, distance and light are working together, make a small number of deliberate photographs. Change one thing at a time: a slightly lower angle, a tighter crop, a different focus point. This makes it easier to understand why one version works better than another.
When reviewing the pictures later, avoid choosing only by sharpness. Look for the frame that has the clearest relationship between flower and background, the most natural balance of space, and the light that best describes the petals.
A single flower is a modest subject, which is exactly why it is useful. There is nowhere for weak composition to hide. Spending ten quiet minutes with one bloom can teach more about framing than taking dozens of hurried pictures in a spectacular garden.